
Do you know those little cute thingies that don’t really have any purpose other than just being cute, but you must have? The useless kawaii crap? Yep, you know perfectly well what I’m talking about, I can sense them piling up behind your screen… No judging from me though, I can never have enough of them either. If you’re currently short on ideas how to purchase new cute little objects for your collection, I present you a quick tutorial of making some pixel art by yourself with fusible plastic beads!
![]()
To me, pixel art is basically anything that looks like if it was made of pixels (duh). The great thing about that is that you can easily make anything you’d like with it, such as decoration, coasters, jewelry, stationery and so on. Using beads makes the whole crafting phase quite easy, and above all fun – I find it almost relaxing and in the end I display my geeky « art » with a good deal of pride! Let me walk you through making a pair of tiny pixel angel wings to begin.
What you’ll need
- Fusible plastic beads
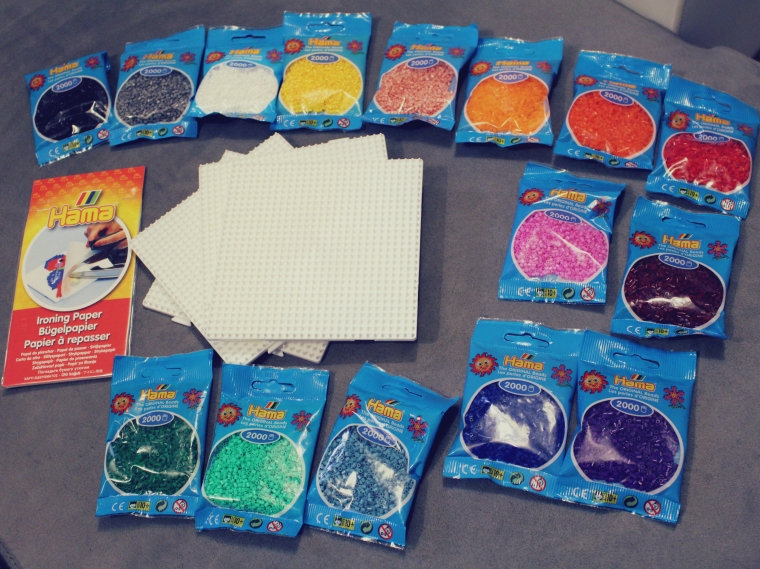
You have several choices, for example Perler or Hama beads which can be found in toy stores or in creative crafting sections. I went for Hama and bought no less than 15 different colors, each bag containing 2000 beads. It may seem huge but if you’re excited like a kid in front of those, trust me it’s not too much.
Nyanla’s tip: make sure that you choose the same size for every color! In Hama’s selection, there is mini, midi and maxi; I chose mini in order to be more precise with my work.
- Pegboard(s)
You can just get one pegboard as they can be used as many times as needed. Although, if you’re planning on building something bigger, thinking of several pegboards that you can attach one to the other might be useful.
Nyanla’s tip: watch out, especially if you’re buying on-line and you can’t really tell the size from the pictures, so that the size of your beads is the same as the size suited for your pegboard. If you have mini beads and a maxi pegboard for example, you won’t be able to use them both at all!
- Ironing paper
This paper protects your beads from sticking to the iron during the fusing phase. You can use them several times each.
Nyanla’s tip: I like to put on some smaller crafts not one but two layers of ironing paper to ensure a better protection from the heat. As those sheets are rather big, you can fold them once to obtain two layers.
- Iron
- Tweezers (especially for smaller beads, unless you have tiny fingers)
- Some ideas of what to make
- And a wish to spend a geeky afternoon! ^^
Let’s make some kawaii stuff now!
You can google some ideas by searching for example pixel art, perler beads, hama beads etc. Or you can take any picture you like and put a square grid on it via software to make it pixel-like! Ready?


Let it cool down for about 10 minutes. This leaves you time to tidy up all the mess you’ve done around you with colorful beads all over the place… Or was it just me? >< Anyway, once your pixel art seems cool enough and you feel no resistance lifting the ironing paper up, remove the paper and start retrieving your magnificent art from the pegboard. You might help yourself with tweezers to lift a bit more on the sides, be careful though not to crush it. Once you’re done, congratulations; you’re a pixel artist now! You can glue it to a head pin, frame it and display on a wall, use as a cosplay prop… or give a pair of wings to your cat and see what happens:

Same old, apparently.
As we’ve established that even with special pixel art wings cats still don’t fly, I hope that you liked this tutorial and you found it useful to make some geeky art by yourself! What would be your first pixel art? Maybe you already knew how to do it and you have some creations or tips you’d like to share?

Cat gives negative effs. XD
Does look like a fun idea though.
J’aimeJ’aime
To me it’s like a coloring book, you can really relax by assembling those beads on a pegboard and you can definitely have fun too. And don’t feel too bad for my cat, she fell asleep on my lap only minutes after taking this photo. She didn’t mind that much I guess ^^
J’aimeAimé par 1 personne
Love the Totoro creation…that would make a perfect coaster, so totally not useless 😉
J’aimeJ’aime
YES, thank you! It serves pretty well as a coaster… But I haven’t had the audacity of trying with a hot drink yet; too afraid of melting the poor Totoro!
J’aimeJ’aime
This is awesome! I used to love these bead art sets. That wreath is fantastic. It’s giving me ideas!
J’aimeJ’aime
Thank you Tonya, make sure to share your creations later! ^^
J’aimeJ’aime
This is so cute! I do also buy at Hamabeads (at their online shop), they have very good prices and the shippings are quick.
J’aimeAimé par 1 personne
This is fabulous! ❤ ❤ ❤ ❤ ❤
J’aimeJ’aime
Thank you dear ! 🙂
J’aimeAimé par 1 personne
I love it! But what I love the most is your cat with wings! Super cute ó.ò
J’aimeJ’aime
Haha thank you! ^^ I was surprised to see that she was totally ok with those on her back… My guess is that she’d make a wonderful cat top-model 😀
J’aimeJ’aime